PostgreSQL Database Windows Setup FAQ
- Overview
- Cygwin
- CygIPC
- PostgreSQL
- pgAdmin GUI
- JDBC
- Orion J2EE
- Credits
Overview
Installing PostgreSQL on Windows makes for an extremely powerful
J2EE development platform. To read more about PostgreSQL visit the
Evolution Hosting PostgreSQL general FAQ.
The following PostgreSQL-Windows setup instructions utilize the
Cygwin Unix-on-Windows emulation environment in order to speed
the setup process, and increase the overall power
and flexibility of Windows.
Below are the steps to install, configure, and run PostgreSQL on
Windows. The final step explains how to get an Orion J2EE-EJB application
running on PostgreSQL.
Steps to set up PostgreSQL on Windows
- Cygwin
Cygwin (www.cygwin.com) is a UNIX
environment for Windows. It consists of two parts:
- A DLL (cygwin1.dll) which acts as a UNIX emulation layer providing substantial UNIX API functionality.
- A collection of tools, ported from UNIX, which provide UNIX/Linux look and feel.
The Cygwin DLL works with all versions of Windows since Windows 95, with the exception of Windows CE.
Installing Cygwin involves downloading the software to the target computer
and initiating the install program (accept defaults unless otherwise noted).
Note that the Cygwin installation program changes often and these steps may differ
slightly from the current release.
-
To obtain the software, go to
www.cygwin.com and click
on the Install link.
-
Choose to save the file
setup.exe to a local temp directory
(e.g., d:\temp\).
-
Launch the saved file
d:\temp\setup.exe
-
Splash Screen - click Next.
-
Install From Screen - choose the Download from Internet install option
as opposed to the Install from Internet option.
-
Local Package Directory - place the install files in a temporary directory
(e.g.,
d:\temp\cygwin).
-
Direct Connection Screen - choose a connection method.
-
Select Download Site Screen - choose a download location.
-
Select Packages to Download Screen - Evolution Hosting recommends installing all
packages. Note, however, that it is a very large intstall and may fail over 56k connections.
To install everything, Click on the All list item until Install
is displayed on the right side.
Next, initiate the install. After this, initiate the transfer.
-
When the transfer is complete, launch the
setup.exe program again.
-
Splash Screen - click Next.
-
Install From Screen - this time, choose the Install from Local Directory install option
for the source directory.
-
Select Install Root Directory Screen - choose an install destinationbdirectory.
Evolution Hosting typically installs Cygwin in
d:\apps\cygwin\.
Note that from this point forward d:\apps\cygwin\
will be referred to as: CYGWINHOME/.
-
Local Package Directory - make sure it is pointing to the location that the setup
files were downloaded into (should be defaulted to this, e.g.,
d:\temp\cygwin,
then click Next.
-
Select Packages to Install Screen - click the View button
when selecting install packages until the Full option is displayed.
The packages may have to be clicked on one-at-a-time in order to ensure that they
are all installed. Next, initiate the install.
-
Add the Cygwin
bin d:\apps\cygwin\bin)
directory to the system PATH environment variable.
Note this must come after ActiveState Perl, if Perl is to be used on
the computer. The Evolution Hosting tutorials Odin and Sphinx, for example, use
ActiveState Perl.
Note that the Cygwin bin directory has to be placed in the path before the
Windows program directories, because the sort.exe program has to be taken
from Cygwin, not Windows.
Part of the Cygwin install actually includes PostgreSQL. Normally, one must download,
compile, and configure PosgreSQL, but since Cygwin has been including the
database with its download, configuration has gotten much easier. There will
be no need for a separate PostgreSQL download, other than the PostgreSQL JDBC
Driver and Admin GUI.
To test the Cygwin install, launch a Cygwin shell window from the desktop or
Windows Start Menu and type the ls command. It should provide a directory listing
similar to the MS-DOS dir command.
Cygwin support is available via the general Cygwin
mailing list.
PostgreSQL also has a Cygwin-PostgreSQL
mailing list.
- CygIPC
CygIPC is a cygwin utility that is required to run PostgreSQL. CygIPC provides
shared memory, semaphores, and message support for cygwin. CygIPC is available at
this
mirror site. The binaries should come with
Note: versions of CygIPC prior to 1.04 will not work.
To install:
- Download the latest binary file (e.g.,
cygipc-1.10-1.tar.bz2)
and save it to CYGWINHOME/ directory.
-
Launch a Cygwin shell window from the desktop or Windows Start Menu.
Extract the file to the
CYGWINHOME/ directory. This should place the file
ipc-deamon.exe and related files in CYGWINHOME/usr/local/
and/or subdirectories.
Most of the packages on the CygIPC site are distributed in .tar.bz2 format. This means
that they have been compressed using the 'bzip2' compression program, a
patent-unencumbered algorithm that usually outperforms gzip, compress, and zip
compressors. The bzip package is part of the official Cygwin distribution.
So, bunzip2.exe should be sitting in the CYGWINHOME/bin directory.
So, to install the precompiled packages from the CygIPC site:
cd /
bunzip2 -c <path-to-archive>/foo.tar.bz2 | tar xvf -
To test the CygIPC install, launch a Cygwin shell window from the desktop or
Windows Start Menu and type:
ipc-daemon &
It should echo its process number and give no errors.
Note that the & instructs Cygwin to launch the command
in its own background process.
- PostgreSQL
Since the PosgreSQL binaries and documentation were downloaded with Cygwin, installation
can begin straight-away. Here are some other sources of documentation that may help:
-
Note that the PostgreSQL Windows install README document located in
/usr/doc/Cygwin/ is also an excellent resource for this entire installation
guide. Here is one version of that document.
This document also explains installing PostrgreSQL as a Windows Service.
-
Cygwin also comes with other documentation in the
\usr\doc\postgresql-7.1.3\
directory. The /html subdirectory contains full HTML docs
for the included version.
To set up and start the first PostgreSQL database
(note that commands are
CASE SENSITIVE):
- launch a Cygwin shell window from the desktop or Windows Start Menu.
-
Navigate to the directory:
/usr/local/pgsql/data
, which can be done by typing a command similar to:
cd /usr/local/pgsql/data
Note that the command:
cd c:
will switch back to the C drive.
Also note that /cygdrive/C is a Cygwin alias for Windows drive letters.
In this case it refers to a Windows C: drive.
A shortcut can be achieved by creating an empty directory d in the
/cygdrive
Then the command mount d:/ /d can be done
so that the d:\ drive can be accessed as /d instead of /cygdrive/d
-
Now type the command:
ipc-daemon &
This starts a daemon necessary for PostgreSQL to run.
-
To initialize PostgreSQL, type the command:
initdb -W -D /cygdrive/d/apps/cygwin/usr/local/pgsql/data
Note, the -W option prompts for a password for the
new superuser. The superuser username usually defaults to
Administrator.
Note that most PostgreSQL commands accept the -? option
to list information and options about commands.
-
To start PostgreSQL Postmaster, type the command:
postmaster -i -D /cygdrive/d/apps/cygwin/usr/local/pgsql/data
Note, in order for the postmaster to accept TCP/IP connections
(rather than just Unix domain socket connections),
The -i option must be specified.
Note that it is useful to run the Postmaster in its own window, as above,
so that logging messages can be viewed. It may, however, also be run as
a background process with the & option.
-
To create the first database (here called mydb), open a new Cyqwin window and
type the command:
createdb mydb
Note that you may use the -e option to show the query being
sent to the backend.
-
To test mydb, type the command:
psql mydb
Note that the ipc-daemon & must always be running in order to start PostgreSQL.
PostgreSQL support is available via the general PostgreSQL
mailing list.
PostgreSQL also has a Cygwin-PostgreSQL
mailing list.
Here is a link to a PostgreSQL Windows setup
newsgroup posting
that may be of some help.
- pgAdmin GUI
The pgAdmin
(pgadmin.postgresql.org)
GUI provides an interface to do things like add users, view data,
and modify tables in the PostgreSQL database.
To install:
-
Go to the pgAdmin site and download the latest version
(e.g., pgadmin2-1_1_34.zip).
- Extract the file to a temp directory.
- Run
install.exe
- Launch the program from the Windows Desktop or Start Menu.
-
Enter credentials and log on to the database:
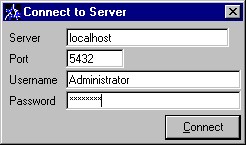
-
At which point the admin screen should appear, resembling:
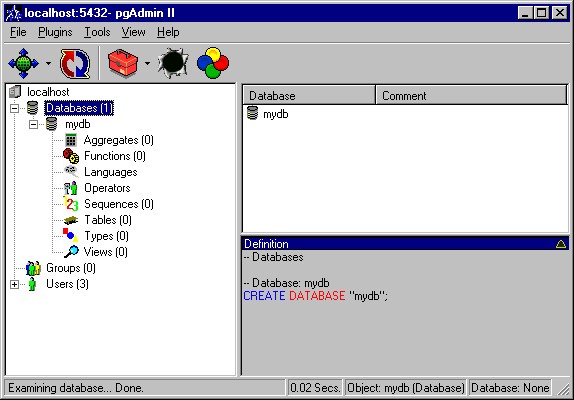
pgAdmin support is available via the pgAdmin:
mailing list.
- JDBC
PostgreSQL has its own JDBC driver available from the PostgreSQL
JDBC site.
The driver also comes with the Cygwin install and is located here:
/usr/share/postgresql/java/postgresql.jar
To install the drivers:
- Download the Jar file (e.g.,
jdbc7.0-1.2.jar).
-
Include the Jar file in the Java classpath of the application
that will access the drivers.
-
To use PostgreSQL with the JDBC drivers, the
postmaster
must be started with the -i flag. This allows TCP/IP
connections to the database - a requirement of JDBC. Java does
not support Unix domain sockets.
-
The PostgreSQL
pg_hba.conf file may need to be modified to
allow access from the JDBC client (it comes with localhost already enabled).
This is a standard configuration allowing open access to any local
connection:
local        all                                           trust
host         all         127.0.0.1     255.255.255.255     trust
This is a more restricted configuration (Evolution Hosting recommends this),
which requires password authentication:
local        all                                           password
host         all         127.0.0.1      255.255.255.255    password
host         mydb        192.168.10.5   255.255.255.0      password
Note that the 192.168.10.5 allows an external
computer password access to mydb.
The pg_hba.conf file and the PostgreSQL documentation
contain more information.
-
Whether in an application server datasource config settings,
or in a Java class JDBC connection statement, the proper JDBC url
must be provided. For PostgreSQL they are one of the following:
- jdbc:postgresql:database
- jdbc:postgresql://host/database
- jdbc:postgresql://host:port/database
Where database is the database to connect to, host is the server to
connect to, and port is the port number.
To use the drivers:
-
Any source that uses JDBC needs to import the java.sql package, using:
import java.sql.*;
Note that the org.postgresql package must not be imported.
If it is, the source will not compile, as javac will get confused.
-
Before connecting to a database, the driver must be loaded. There are
two methods available, and which one is best depends on the situation:
-
Implicitly loading the driver using the
Class.forName() method. Loading PostgreSQL looks like this:
Class.forName("org.postgresql.Driver");
This will load the driver, and while loading, the driver will
automatically register itself with JDBC. Note: The forName()
method can throw a ClassNotFoundException if the driver
is not available.
This is the most common method to use, but restricts code to use only
Postgres. If the code may access another database system in the future,
and Postgres-specific extensions are not used, then the second method
is advisable.
-
Passing the driver as a parameter to the JVM as it
starts, using the
-D argument. For example:
java -Djdbc.drivers=org.postgresql.Driver example.ImageViewer
In this example, the JVM will attempt to load the driver as part of its
initialization. Once done, the ImageViewer is started.
This method is the better one to use because it allows code to be
used with other database packages without recompilation. The only
thing that would also change is the connection URL, which is covered next.
One last thing: when code then tries to open a Connection, and a No driver
available SQLException is thrown, there is either an issue finding the
driver in the classpath, or an incorrect value in the URL parameter.
-
With JDBC, a database must be connected to with a URL (Uniform Resource Locator).
With PostgreSQL, this takes one of the following forms:
- jdbc:postgresql:database
- jdbc:postgresql://host/database
- jdbc:postgresql://host:port/database
where:
- host
- The host name of the server. Defaults to localhost.
- port
- The port number the server is listening on. Defaults to the Postgres standard port number (5432).
- database
- The database name.
To connect, a Connection instance needs to be obtained from JDBC. To do this,
the DriverManager.getConnection() method is called:
Connection db = DriverManager.getConnection(url, username, password);
-
To close the database connection, the
close() method is
applied to the Connection:
db.close();
JDBC access can be tested in the next section regarding setting up Orion.
PostgreSQL JDBC Driver support is available via the JDBC PostgreSQL
mailing list.
- Orion J2EE
The Orion
(www.orionserver.com)
J2EE server can be set up to use PostgreSQL in a J2EE/EJB
application.
To configure Orion:
- Add the PosgreSQL JDBC Driver to the classpath when launching Orion.
-
An Orion database-schema descriptor must exist for accurate
datatype interpretation. The file:
config/postgres.xml
should be created if it doesn't exist already.
Here is an example postgres.xml
file from Orion 1.5.3. Here is what the file looks like:
<?xml version="1.0"?>
<!DOCTYPE database-schema PUBLIC "-//Evermind//- Database schema"

"http://www.orionserver.com/dtds/database-schema.dtd">

<database-scheme name="PostGreSQL" not-null="not null" null="null" primary-key="primary key">
    <type-mapping type="java.lang.String" name="varchar(255)" />
    <type-mapping type="int" name="integer" />
    <type-mapping type="long" name="integer" />
    <type-mapping type="float" name="float" />
    <type-mapping type="double" name="double precision" />
    <type-mapping type="byte" name="smallint" />
    <type-mapping type="char" name="char" />
    <type-mapping type="short" name="integer" />
    <type-mapping type="boolean" name="bool" />
    <type-mapping type="java.util.Date" name="timestamp" />
    <type-mapping type="java.io.Serializable" name="oid" />

    <disallowed-field name="position" />
    <disallowed-field name="parent" />
    <disallowed-field name="password" />
    <disallowed-field name="username" />
    <disallowed-field name="date" />
    <disallowed-field name="order" />
    <disallowed-field named="abort" />
    <disallowed-field named="analyze" />
    <disallowed-field named="binary" />
    <disallowed-field named="cluster" />
    <disallowed-field named="constraint" />
    <disallowed-field named="copy" />
    <disallowed-field named="do" />
    <disallowed-field named="explain" />
    <disallowed-field named="extend" />
    <disallowed-field named="listen" />
    <disallowed-field named="load" />
    <disallowed-field named="lock" />
    <disallowed-field named="move" />
    <disallowed-field named="new" />
    <disallowed-field named="none" />
    <disallowed-field named="notify" />
    <disallowed-field named="offset" />
    <disallowed-field named="reset" />
    <disallowed-field named="setof" />
    <disallowed-field named="show" />
    <disallowed-field named="transaction" />
    <disallowed-field named="unlisten" />
    <disallowed-field named="until" />
    <disallowed-field named="vacuum" />
    <disallowed-field named="verbose" />
</database-scheme>
-
The file:
config/data-sources.xml
needs to be changed to utilize PostgreSQL as a
datasource by adding the following lines to that file:
<?xml version="1.0"?>
<data-sources>
  <data-source
    name="Default data-source"
    class="com.evermind.sql.ConnectionDataSource"
    inactivity-timeout="900"
    max-connections="15"
    location="jdbc/DefaultDS"
    pooled-location="jdbc/DefaultPooledDS"
    xa-location="jdbc/xa/DefaultXADS"
    ejb-location="jdbc/DefaultEJBDS"
    schema="postgresql.xml"
    url="jdbc:postgresql://localhost/mydb"
    connection-driver="org.postgresql.Driver"
    username="john"
    password="password"
  />
</data-sources>
With the following substitutions:
localhost- The hostname of the database server.
mydb- The database name.
john- The username.
password- The password.
Important Note
When Orion starts up or interacts with PostgreSQL, it may display an error similar to this:
SQL error: ERROR: parser: parse error at or near ")"
This is a known issue and has no affect on applications - disregard this message.
Orion support is available via the Orion Server:
mailing list.
And also via:
Orion Support.
- Credits
Many thanks to Ed Wolpert who helped in the construction of this FAQ. Ed is
currently working on the PostgreSQL JDBC Driver.
That completes the PostgreSQL Windows Install FAQ. Please contact support with any upgrades or suggestions.
It is worthwhile to spend some time at the PostgreSQL website. The documentation
and mailing lists cover topics ranging from general database functionality to SQL
usage and techniques.
 |